CrossChain
CrossChain in fabric
前言
今天公司让我整理一个基于fabric的跨链的方案,之前没怎么接触过跨链,在这里记录下自己的思路吧。
首先,先明白几个概念。什么是跨链?我的理解是跨链是跨channel。下面详细说下我的理由:
- 回顾下fabric的启动过程:创建证书,生成创世区块,通道配置交易块,创建通道,节点加入通道,安装链码,实例化链码,链码的调用。这个是完整的生命周期。
- 一个节点上可以安装多个chaincode,且每个chaincode是一个账本。
- 同一个通道中,所有的节点安装的是相同的chaincode,所以每个节点都有完整的数据,不存在跨链之说。
- 综上,跨链是指跨channel,因为不同的channel拥有不同的账本,跨链的本质是把一个链上的数据转移到另外一条链上。
跨链我们既可以在上层来做,也可以在chaincode层来做。经过查找我发现了一个InvokeChaincode方法,看着不错,看上去是用来调用其他的chaincode的。
所以我设计如下的跨链方案:
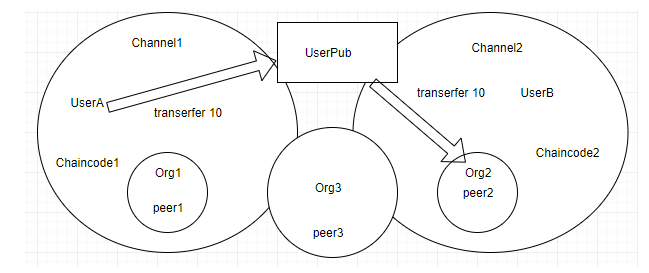
简单描述下:Org1中的peer1和ORG3中的peer3加入channel1,并且安装Chaincode1,Org2中的peer2 和ORG3中的peer3加入channel2,并且安装Chaincode2。 peer3这个节点是可以跨链的关键所在,因为该节点同时拥有两个通道的数据。
先整个简易版的跨链流程:
- Chaincode1:UserA向UserPub转移10元钱,UserPub把这笔钱标记为已锁定:
- Chaincode2:通过invokeChaincode查询UserPub是否已经锁定该笔钱。未锁定,则终止该次跨链,并把资产转回UserA。否则执行3
- Chaincode2:UserPub向UserB转移10元钱,同时UserPub把这笔钱标记为已转移(注:该笔钱不可退回UserA。)
- 跨链完成
事情到这里,并没有完,上面的操作不是一个原子操作,所以我们必须要考虑事务性,如果中间步骤出错,我们要将整个过程进行回滚,并且这是在分布式的环境下完成的,哎,真的让人头大。
工欲善其事必先利其器,下面我们来搭建跨链所需的环境
1. 搭建跨链环境
1.1 生成证书
在开始之前,我们需要相应的搭建相应的开发环境,我是在fabric的源码基础上进行做的。基于 fabric v1.3.0 我的环境规划是:Org1有1个peer节点,Org2有1个peer节点,Org3有1个节点,其中Org1和Org3加入channel1,安装chaincode1,Org2和Org3加入channel2,安装chaincode2。
下面我所改动的文件的详细内容请参考: https://github.com/Anapodoton/CrossChain
证书的生成我们需要修改如下配置文件: crypto-config.yaml docker-compose-e2e-template.yaml docker-compose-base.yam generateArtifacts.sh
我们需要添加第三个组织的相关信息,修改相应的端口号。
改动完成之后,我们可以使用cryptogen工具生成相应的证书文件,我们使用tree命令进行查看。
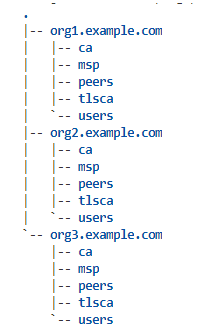
1.2 生成创世区块,应用通道配置交易文件和锚节点配置更新交易文件
我们需要修改configtx.yaml文件和generateArtifacts.sh文件。
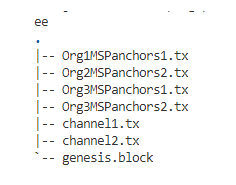
我们使用的主要工具是configtxgen工具。目的是生成系统通道的创世区块,两个应用通道channel1和channel2的配置交易文件,每个channel的每个组织都要生成锚节点配置更新交易文件。生成后的文件如下所示:
1.3 启动相应的容器
我们首先可以使用docker-comppose-e2e来测试下网络的联通是否正常。
docker-compose -f docker-compose-e2e.yaml 看看网络是否是正常的 ,不正常的要及时调整。
接下来,我们修改docker-compose-cli.yaml,我们使用fabric提供的fabric-tools镜像来创建cli容器来代替SDK。
1.4 创建网络
这里主要使用的是script.sh来创建网络,启动orderer节点和peer节点。
我们创建channel1,channel2,把各个节点分别加入channel,更新锚节点,安装链码,实例化链码。
上面的操作全部没有错误后,我们就搭建好了跨链的环境了,这里在逼逼一句,我们创建了两个通道,每个通道两个组织,其中Org3是其交集。下面可以正式的进行跨链了。
其实在前面的操作中,并不是一帆风顺的,大家可以看到,需要修改的文件其实还是蛮多的,有一个地方出错,网络就启动不了,建议大家分步进行运行,一步一步的解决问题,比如说,我在configtx.yaml文件中,ORG3的MSPTYPE指定成了idemix类型的,导致后面无论如何也验证不过,通道无法创建成功。
简单说下idemix,这个玩意是fabric v1.3 引入的一个新的特性,是用来用户做隐私保护的,基于零知识证明的知识,这里不在详述,感兴趣的可以参考: fabric关于idemix的描述
2. 跨链关键技术
2.1 API解读
找到fabric提供了这么一个函数的文档,我们先来看看。
// InvokeChaincode documentation can be found in
interfaces.gofunc (stub *ChaincodeStub) InvokeChaincode(chaincodeName string, args [][]byte, channel string) pb.Response {
// Internally we handle chaincode name as a composite name
    if channel != "" {
    chaincodeName = chaincodeName + "/" + channel
    }
    return stub.handler.handleInvokeChaincode(chaincodeName, args, stub.ChannelId, stub.TxID)}
下面是官方的文档说明:
// InvokeChaincode locally calls the specified chaincode `Invoke` using the
// same transaction context; that is, chaincode calling chaincode doesn't
// create a new transaction message.
// If the called chaincode is on the same channel, it simply adds the called
// chaincode read set and write set to the calling transaction.
// If the called chaincode is on a different channel,
// only the Response is returned to the calling chaincode; any PutState calls
// from the called chaincode will not have any effect on the ledger; that is,
// the called chaincode on a different channel will not have its read set
// and write set applied to the transaction. Only the calling chaincode's
// read set and write set will be applied to the transaction. Effectively
// the called chaincode on a different channel is a `Query`, which does not
// participate in state validation checks in subsequent commit phase.
// If `channel` is empty, the caller's channel is assumed.
InvokeChaincode(chaincodeName string, args [][]byte, channel string) pb.Response
上面的意思是说: InvokeChaincode并不会创建一条新的交易,使用的是之前的transactionID。 如果调用的是相同通道的chaincode,返回的是调用者的chaincode的响应。仅仅会把被调用的chaincode的读写集添加到调用的transaction中。 如果被调用的chaincode在不同的通道中,任何PutState的调用都不会影响被调用chaincode的账本。
再次翻译下,相同的通道invokeChaincode可以读可以写,不同的通道invokeChaincode可以读,不可以写。(但是可以读也是有前提的,二者必须有相同的共同的物理节点才可以)。下面我们写个demo来验证下。
2.2 验证
下面我简单搭建一个测试网络来进行验证,还是两个channel,channel2中的chaincode通过invokeChaincode方法尝试调用chaincode1中的方法,我们来看看效果。
我们采用方案的核心是不同通道的Chaincode是否可以query? 需要在什么样的条件下才可以进行query?
其中chaincode1是fabric/examples/chaincode/go/example02,chaincode2是fabric/examples/chaincode/go/example05
直接贴出queryByInvoke核心代码:
f := "query"
    queryArgs := toChaincodeArgs(f, "a")
    // if chaincode being invoked is on the same channel,
    // then channel defaults to the current channel and args[2] can be "".
    // If the chaincode being called is on a different channel,
    // then you must specify the channel name in args[2]
    response := stub.InvokeChaincode(chaincodeName, queryArgs, channelName)
我们分别执行如下两次查询: 第一次: ` peer chaincode query -C “channel1” -n mycc1 -c ‘{“Args”:[“query”,”a”]}’ `
结果如下:可以查到正确的结果。

我们再次查询,在channel2上通过chaincode2中的queryByInvoke方法调用channel1的chaincode1中的query方法:
peer chaincode query -C "channel2" -n mycc2 -c '{"Args":["queryByInvoke","a","mycc1"]}'
结果如下所示:
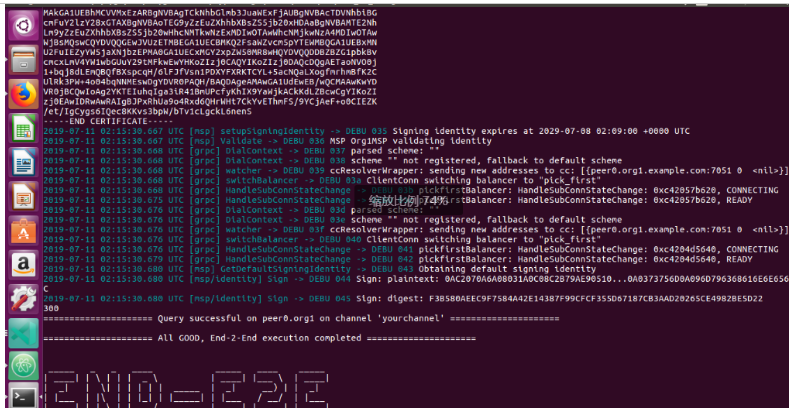
我们成功的跨越通道查到了所需的数据。但是事情真的这么完美吗?如果两个通道没有公共的物理节点还可以吗?我们再来测试下,这次我们的网络是channel1中有peer1,channel2中有peer2,二者没有共同节点,我们再次在channel2中InvokeChaincode Channel1中的代码,废话不再多说,我们直接来看调用的结果:

综上:结论是不同的通道可以query,但前提必须是有共同的物理节点。
2.3 深入了解
下面的内容不是必须看的,我们来深入进去看看invokeChaincode到底是如何实现的。我们发现上面的代码引用了fabric/core/chaincode/shim/interfaces.go中的ChaincodeStubInterface接口的InvokeChaincode(chaincodeName string, args [][]byte, channel string) pb.Response
该接口的实现在其同目录下的Chaincode.go文件中,我们看其代码:
// InvokeChaincode documentation can be found in interfaces.go
func (stub *ChaincodeStub) InvokeChaincode(chaincodeName string, args [][]byte, channel string) pb.Response {
// Internally we handle chaincode name as a composite name
if channel != "" {
    chaincodeName = chaincodeName + "/" + channel
}
return stub.handler.handleInvokeChaincode(chaincodeName, args, stub.ChannelId, stub.TxID)}
该方法把chaincodeName和channel进行了拼接,同时传入了ChannelId和TxID,二者是Orderer节点发送来的。然后调用了handleInvokeChaincode,我们在来看handleInvokeChaincode。在同目录下的handler.go文件中。
/ handleInvokeChaincode communicates with the peer to invoke another chaincode.
func (handler *Handler) handleInvokeChaincode(chaincodeName string, args [][]byte, channelId string, txid string) pb.Response {
	//we constructed a valid object. No need to check for error
	payloadBytes, _ := proto.Marshal(&pb.ChaincodeSpec{ChaincodeId: &pb.ChaincodeID{Name: chaincodeName}, Input: &pb.ChaincodeInput{Args: args}})

	// Create the channel on which to communicate the response from validating peer
	var respChan chan pb.ChaincodeMessage
	var err error
	if respChan, err = handler.createChannel(channelId, txid); err != nil {
		return handler.createResponse(ERROR, []byte(err.Error()))
	}

	defer handler.deleteChannel(channelId, txid)

	// Send INVOKE_CHAINCODE message to peer chaincode support
	msg := &pb.ChaincodeMessage{Type: pb.ChaincodeMessage_INVOKE_CHAINCODE, Payload: payloadBytes, Txid: txid, ChannelId: channelId}
	chaincodeLogger.Debugf("[%s] Sending %s", shorttxid(msg.Txid), pb.ChaincodeMessage_INVOKE_CHAINCODE)

	var responseMsg pb.ChaincodeMessage

	if responseMsg, err = handler.sendReceive(msg, respChan); err != nil {
		errStr := fmt.Sprintf("[%s] error sending %s", shorttxid(msg.Txid), pb.ChaincodeMessage_INVOKE_CHAINCODE)
		chaincodeLogger.Error(errStr)
		return handler.createResponse(ERROR, []byte(errStr))
	}

	if responseMsg.Type.String() == pb.ChaincodeMessage_RESPONSE.String() {
		// Success response
		chaincodeLogger.Debugf("[%s] Received %s. Successfully invoked chaincode", shorttxid(responseMsg.Txid), pb.ChaincodeMessage_RESPONSE)
		respMsg := &pb.ChaincodeMessage{}
		if err := proto.Unmarshal(responseMsg.Payload, respMsg); err != nil {
			chaincodeLogger.Errorf("[%s] Error unmarshaling called chaincode response: %s", shorttxid(responseMsg.Txid), err)
			return handler.createResponse(ERROR, []byte(err.Error()))
		}
		if respMsg.Type == pb.ChaincodeMessage_COMPLETED {
			// Success response
			chaincodeLogger.Debugf("[%s] Received %s. Successfully invoked chaincode", shorttxid(responseMsg.Txid), pb.ChaincodeMessage_RESPONSE)
			res := &pb.Response{}
			if err = proto.Unmarshal(respMsg.Payload, res); err != nil {
				chaincodeLogger.Errorf("[%s] Error unmarshaling payload of response: %s", shorttxid(responseMsg.Txid), err)
				return handler.createResponse(ERROR, []byte(err.Error()))
			}
			return *res
		}
		chaincodeLogger.Errorf("[%s] Received %s. Error from chaincode", shorttxid(responseMsg.Txid), respMsg.Type)
		return handler.createResponse(ERROR, responseMsg.Payload)
	}
	if responseMsg.Type.String() == pb.ChaincodeMessage_ERROR.String() {
		// Error response
		chaincodeLogger.Errorf("[%s] Received %s.", shorttxid(responseMsg.Txid), pb.ChaincodeMessage_ERROR)
		return handler.createResponse(ERROR, responseMsg.Payload)
	}

	// Incorrect chaincode message received
	chaincodeLogger.Errorf("[%s] Incorrect chaincode message %s received. Expecting %s or %s", shorttxid(responseMsg.Txid), responseMsg.Type, pb.ChaincodeMessage_RESPONSE, pb.ChaincodeMessage_ERROR)
	return handler.createResponse(ERROR, []byte(fmt.Sprintf("[%s] Incorrect chaincode message %s received. Expecting %s or %s", shorttxid(responseMsg.Txid), responseMsg.Type, pb.ChaincodeMessage_RESPONSE, pb.ChaincodeMessage_ERROR)))
}
我们来说下上面的步骤:
- 序列化查询参数
- 使用channelId+ txid创建了一个txCtxID通道(这里的通道指的是go里的通道,用于消息的发送和接收,不是fabric里的,不要混淆。)
- 构造INVOKE_CHAINCODE类型的消息
- sendReceive(msg *pb.ChaincodeMessage, c chan pb.ChaincodeMessage) 通过grpc发送invokeChaincode(包括查询参数,channelID和交易ID)消息直到响应正确的消息。
- serialSendAsync(msg, errc)
- serialSend(msg *pb.ChaincodeMessage)
- 处理响应,如果接收到ChaincodeMessage_RESPONSE和ChaincodeMessage_COMPLETED类型的消息,说明InvokeChaincode成功,否则失败。
- 删除txCtxID
总结:InvokeChaincode本质上是构造了一个txCtxID,然后向orderer节点发送消息,最后把消息写入txCtxID,返回即可。
3. 跨链的实现
前面已经提到跨链的方案:
- Chaincode1:UserA向UserPub转移10元钱,UserPub把这笔钱标记为已锁定:
- Chaincode2:通过invokeChaincode查询UserPub是否已经锁定该笔钱。未锁定,则终止该次跨链,并把资产转回UserA。否则执行3
- Chaincode2:UserPub向UserB转移10元钱,同时UserPub把这笔钱标记为已转移(注:该笔钱不可退回UserA。)
- 跨链完成
其本质是通过一个公用账户来做到的,通过invokeChaincode来保证金额确实被锁定的。这里面其实是有很大的问题,我们需要侵入别人的代码,这里就很烦,很不友好。
下面我们来看看其实现:
Chaincode1:
在初始化函数中,我们定义了两个用户A和UserPub,以及userPubStatus。

然后我们调用Chaincode1从A向UserPub转10元钱,同时把userPubStatus置位0。
然后我们在Chaincode2调用invokeChaincode查询UserPub是否已经锁定该笔钱,即若userPubStatus为0,则已锁定。
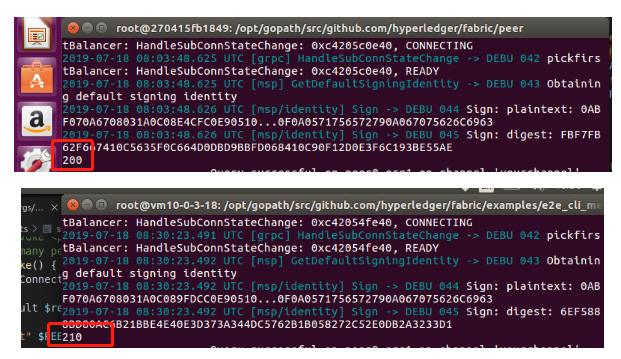
然后在Chaincode2中从UserPub向UserB(UserB原来有200元钱)转10元钱。同时在Chaincode1中把UserPub设置为1。
下面是UserB转账前和转账后的余额:
4. 总结
在这次方案的研究中,还是踩了很多的坑的,现总结如下:
- 对待一个陌生的东西,一定要先看官方文档,然后写个简单的demo进行验证。不要急着先干活。根据验证的结果在决定下面怎么办?
跨链在实际的业务中还是需要的,虽然无法通过chaincode来实现,但是还是要想其他办法的。
跨链的实现是很复杂的,中间人这个方案需要很多的前置条件的,现在列出来:
| 跨链前提 | 原因 |
|---|---|
| 两条链需要有一个共同的物理节点 | 有相同的物理节点才可以查询到数据 |
| 需要有一个中间账户 | 中间账户保证不会出现双花问题 |
| 中间账户必须是相同的CA签发的 | 相同CA可以保证同一个用户 |
| 必须侵入跨链双方的链码 | 转账的逻辑是在双方链码实现的 |
| 双方认可的转账流程 | 保证 |


